Objectives:
-
After completing reading in the manual, online module, and class activities, the student will in class:
- Identify the components of site consideration
- Describe process of garden bed preparation
- List the benefits of a properly applied organic mulch
Compendium:
Some of you may have very green thumbs and a large assortment of tools in your gardening tool shed. Others of you may be a novice gardener with a few hand me downs in a tool bucket that you pull out as you learn how to garden. Wherever you’re at on the gardening continuum, you need to have a basic understanding of why and how we manipulate our plants for their health, productivity, and aesthetics.
For this module on general gardening practices we discuss many of the common activities we do in the garden. And, we’ll do it through the lens of integrated pest management, because these really ARE your tools for mechanical and cultural management of pests and problems in the garden. We’ll take a fairly high level overview of the topics in order to review the similarities of common gardening techniques used with herbaceous, woody, ornamental, and edible plants. In other modules, we’ll go into more detail on those methods. We will NOT cover those super special things that can be done in the garden, such as espalier pruning or square foot vegetable gardening. We also won’t address current gardening trends, like straw bale gardening. Those techniques are best covered in other programs that are beyond the scope of this training.
Landscape Design & Site Selection
Landscape Design & Site Selection
 Many people come to the landscape design class all excited about the artistry that can happen in the garden–such as planning the bloom times of flowers, staggering short plants in the front and tall plants in the back, and considerations of different leaf texture and colors that can be used throughout the design… all the fun stuff!
There are, however, a lot of other important factors to designing a landscape and selecting an appropriate site for a garden. We’ll discuss some of the most important things you need to consider when designing a new garden site.
Before a shovel goes into the ground, there’s some important things to consider. First, what type of garden are you thinking about? Do you want to brighten a spot under a big shady tree? Are you creating a vegetable garden at the local library? Is it to be a native plant garden in a park? I other words… What are YOUR goals for this landscape?
Next, what are the environmental conditions you have to work with? What will be the l light requirements for the type of plants you want to grow? What are the soil conditions? Is a source of water nearby?
Finally, what do your plants need to grow? You can save yourself a lot of effort and better set your garden up for success by making sure you are matching the right plant for the right place.
Taking the time to do a landscape plan and garden site evaluation gives you the opportunity to explore the environment the plants will be growing in, including soil types, quality, quantity and duration of light, existing vegetation, and possibly surrounding structures that may impact plant growth.
Making sure you are selecting the right plants to thrive in your environmental conditions is an important part of Integrated Pest Management. A healthy plant is less susceptible to problems in general than a stressed plant. You’re setting it up for success by picking something that, for example, likes to grow in the shade or can handle clay soils.
Also, plan to obtain the right number of plants and to space out them out so they can achieve optimal growth. Plan your spacing based on the mature size of the plant and how it will grow- is it going to aggressively spread out into the space or stay clumped in one area, for example. This also plays a role in IPM, because how you space your plants can potentially encourage disease conditions or expose soil for weeds to grow.
This also has important implications down the road as plants grow to mature sizes and the maintenance that will be required by you.
Creating a landscape design can be done with the help of a for-hire professional. You can also sketch one out on paper yourself. Some of the most critical decisions for your garden can be made at this stage that will impact the success of your garden for years to come, but it is also a step enthusiastic gardeners skip, resulting in extra work and gardening headaches in the future.
Preparing a Planting Bed
Preparing a Planting Bed
Garden beds can come in all shapes and sizes. We do suggest starting off smaller. You can expand the beds in the future! And smaller successes earlier in your gardening efforts will build confidence when you decide to expand. New beds will require maintenance and weeding, so keep life manageable!
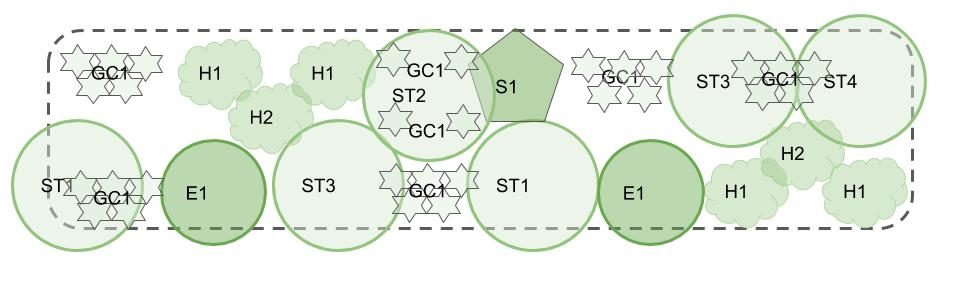
Using garden hoses can be used to define the borders of your potential bed. Adjust the hose to define the size of the bed and shape of the edges. Consider things like the angles of corners or the degree of the curves and how that can impact other maintenance issues, such as mowing around them, in the future. If you’ve never considered this before, take a tip from those who have learned the hard way: intricate bed design can result in a lot of extra string trimming versus simple beds that can be easily mow around. Once you settle on the final shape and size, use spray paint, flags, or whatever works to mark those final boundaries.
If you have a blank slate and are creating a new bed, many times the first thing you need to do is remove the turf. Within those boundaries you have defined, you have several options on how to get rid of the grass.
One option is to physically remove the grass with a shovel or sod stripper. This method involves a lot of elbow grease and heavy lifting but if done correctly you can quickly move onto the next phase of bed development.
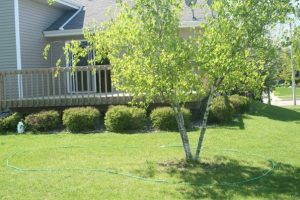
If you have some time to spare, you can attempt to smother the lawn. Gardeners can use layers of wet newspaper covered with about 2 inches of compost or shredded wood chips. It will take some time for the grass underneath to die– perhaps around a month or more– but when it is time to plant you can go right through the mulch and paper.
A final method is to use an all purpose vegetation killer, such as a 2% solution of glyphosate that is very readily sold at garden centers and big box stores. Make sure to follow the label instructions. The label is the law. Carefully spray the grass within the boundaries of your bed and then wait a week or two to see the grass turn brown. You may also find you missed spots and will need to reapply in those areas. Once all is brown, you can then plant through the dead grass, or start to incorporate soil amendments. As with any chemical you may use in the garden, carefully read the instructions and use all necessary personal protective equipment.
Each method has its pro’s and con’s. Digging can offer instant gratification at the cost of sweat equity, while spraying offers an easy way to avoid the heavy lifting at the potential risk of using chemicals.
Once the grass is gone, it is now time to consider soil amendments for the bed. You can determine if your soil needs any certain nutrient needs by doing a soil test. The results of the soil test will let you know if you need to add any potassium or phosphorus for whatever you plan to grow. It will also let you know if you need any pH adjustments or if organic matter is required. Compost is also a great option to add because it can provide organic matter (to help improve soil structure and drainage) and, especially with repeated applications over time, it can slowly add a small amount of nutrients to the soil. Because these types of amendments can take time to get activated in the soil, it may be best for you to create your new beds in the fall, and then follow up with planting everything in the spring.
Once you decide what soil amendments need to go into the new garden bed, it is best to fully incorporate throughout the planting bed (versus dumping it directly into the planting hole). You may want to pull out a roto-tiller and churn it into the ground, but this may cause more problems than its worth. First, it pulverizes the soil, removing the necessary soil structure and pore space plants need. Also, the tines don’t go deep enough, still leaving the additives layered near the surface. The best method is to use a shovel and the “double digging” method. Done properly, this method allows you to work amendments into the ground a full-shovel blade in depth and preserves soil structure that is so important to your plants.
Planting
Planting
A trip to the garden center can introduce you to all the different ways your plants can be purchased.
Most of our annual bedding and vegetable plants come in cell packs of 3,4, or 6 plants and arranged in 10in x 20in flats. Larger ones may be found in 4 inch or 6 inch pots. The growing medium often used is a soilless potting mix– meaning it is mostly organic matter with no mineral component. Many of these have been grown in a greenhouse.
Our perennial ornamentals and edibles can come in larger pots, often one-gallon or larger. These may have been field dug or propagated in a nursery. Most often the growing medium used is a soilless potting mix, and though there may be some greenhouse growing time involved, most have been outdoors for a season or two already.
Woody plants, both ornamentals and edibles, can come in a variety of ways. Ball and burlapped plants are field prepped and dug. These are grown in real soil from the nursery. Woody plants can also be grown in containers, known as containerized stock, ranging in pot sizes of several inches to several gallons, and often in a soilless growing medium.
With all these types of nursery stocks, make sure the plants are well cared for. This includes that they have been well-watered. Make sure the pots are protected from direct sun which can bake the roots inside, so look for plants under mulch or protected by shade. And, plants that have been grown in a pot for too long may have root systems that are bound together and that will make transplanting difficult.
Types of plants:
Some of our plants do not come in a pot at all and are sold barerooted, meaning no soil is in contact with the plant at all. In the spring you can buy dormant strawberry plants, some fruit and ornamental trees, bulbs-such as onions, or tubers such as potatoes. Typically with all of these, they need to go into the ground fairly soon in the spring, or in some cases the fall. Planting a barerooted tree is more involved and will be covered in detail in the woody plants section.
Avoid selecting a plant that is obviously stressed, damaged or infected by pests. It may seem like a good deal if the plant is sold on clearance, but it may be inviting problems into your garden. Oftentimes woody plants sold at full price come with 1 year guarantee. Discounted plants do not have these guarantees. Check before you buy.
If purchasing things like bedding transplants, there are things to watch for. Plants with long, thin stems that are said to be “leggy” may not be the best choice. Instead, try and select compact, bushy plants. Also, it may be preferential to NOT grab that 4-pack of annual in full bloom! Selecting plants that are just getting ready to bloom may be more advantageous both for getting the plant to transplant successfully and for optimize the amount of flowers you can enjoy.
The pots plants come in can be made from a variety of materials– some biodegradable, some recyclable, and some that will go into a landfill. Please check with whomever you are buying plants from to see if they offer a way to recycle the pots or responsibly dispose of the pots for good environmental stewardship.
Time your planting based on the weather:
Pay attention to the last frost date and soil temperatures. Some species can handle soil temperatures from 50-65*, while other warm season crops and ornamentals need warmer soil, around 65-70*. Consult a planting guide for your specific zone or region for specific timing recommendations. There can be some nuances with certain plant species on when is the best time to plant, that you can only ever learn from experience and talking with other knowledgeable gardeners. For example, cool season ornamental grasses may transplant better in the spring than in the heat of the summer. Don’t transplant tomatoes until soil temperature is at 50 degrees. You may find other finicky plants in your garden.
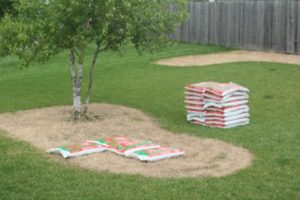
 When planting, remove the transplant from the cell pak. Use your fingers or a knife or other tool to gently break apart the root ball. Don’t worry that you’re going to hurt the plant- this will actually help it take root! Make sure the transplant has soil firmly around its base and watered appropriately. Similar techniques are used with perennial container grown and ball and burlapped plants. As the transplants grow, you will need to make sure they get proper water and nutrients. We’ll discuss those two topics in upcoming sections.
If planting by seed, when and how to plant depends on what you’re growing. Some, like your lawn seed or green bean seed can be directly sown into the ground. Tomatoes and many other vegetables will need to be started indoors and grown to a certain size before moving outdoors. Consult specific instructions and days to harvest when planning. An important consideration when direct seeding is to make sure you keep the soil moist to avoid development of a soil crust (due to minerals in the water). Crusted soil can result in poor germination as delicate seedlings fail to push through. Also, pay attention to timing. You don’t want to rush early in the season to direct seed when the soil hasn’t warmed up enough, unless you know it is the type of seed that can handle the cooler weather. The longer a seed sits in cool soils, the longer it will take to germinate, which puts it at risk for rotting or being eaten by a passing animal or bird.
Watering
Watering
Your plants need adequate moisture to thrive. There are different ways to make sure your plants get the right amount, which for most is about 1” of water per week.
The best water is from rain, but as you know that is not a reliable source. You will likely need to provide extra water, especially if you are establishing new trees or perennials in their first year. Supplemental water means you put it on the garden yourself to help reach that 1inch goal if Mother Nature falls short. This could be from a hose or a watering can or perhaps with the use of a sprinkler system for spaces like lawns. There are soaker hoses that ooze water out the sides. There are tips regarding using these different styles of watering that we’ll discuss in a minute.
-
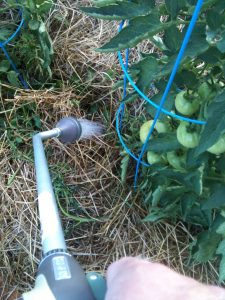
- A water wand can target the base of the plant when applying water.
-
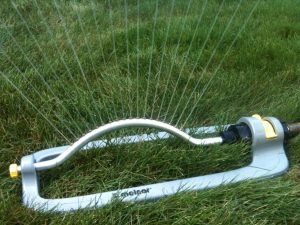
- Sprinkler systems are useful when watering a large area, such as a lawn.
-
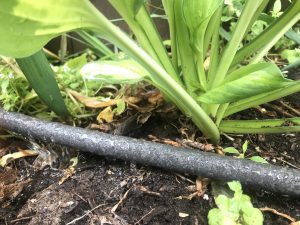
- Drip irrigation can apply water directly to the base of a plant.
Often, a deep, slow watering is best. This means watering less frequently but applying more in a single time when you do water. This helps promote deep root growth versus shallow root growth. This is very important if you are watering in new trees. You also don’t want to dump all the water on in one deluge. This can result in runoff- and your plants not getting what they need. A slower watering allows the water to properly soak into the ground. One exception may be when on sandy soils. In general, if you are on sand, you will want to water a little more frequently and aim to get 1.5” per week on rather than fewer, deeper waterings.
How to water:
This may seem like a silly thing to discuss, but it is actually fairly important in terms of overall plant heath and susceptibility to diseases. Make sure to water the base of the plant and where the root system is rather than wetting the leaves. Water on the leaves creates a potential environment for disease development, so try your best to avoid wetting the foliage. You will also want to avoid any hose settings that produce a focused, intense jet spray as that may blast away soil and disrupt the root system.
Timing:
When you water matters. The best time is in the morning. This allows for the rest of the day to have the sun evaporate any moisture on the leaves, reducing the chances of creating a hospitable environment for disease growth. If your schedule only allows for watering in the evenings, try and water at the base and avoid wetting the foliage. Watering during the heat of the day results in increased evaporation from the soil, reducing the amount of water available to the plant.
Problems to avoid:
- Too little water: If you neglect to water your plants, this results in plant stress, wilting, and potentially even plant death. If you have allowed your plant to get too dried out, a slow, deep watering may help revive it.
- Too much water: This can result in plant wilting or death as well. Too much water prevents oxygen from getting to the root system, which can be harmful. Allowing the soil or container to dry out a little in between waterings is ok.
- Wetting the foliage: As mentioned earlier, this can result in creating a favorable environment for diseases to grow, particularly fungal pathogens. Avoid this by watering earlier in the day so the leaves have time to dry off as water evaporates.
Mulching
Mulching
There are many great reasons to use mulch. You may use it for one specific reason but your garden is reaping numerous benefits. Let’s discuss some of them.
- Weed suppression: Mulch prevents sunlight from reaching the soil surface, suppressing many weeds as they germinate and start to grow. Applying a mulch can help reduce weed pressure immensely.
- Soil moisture retention: Mulch helps reduce the evaporation of water from the soil, allowing it to be accessed by your plant’s roots for longer in between waterings.
- Disease reduction: Some plant diseases, notably fungal ones, are spread as water drops fall onto the soil surface and disease causing spores are splashed onto plant material. Mulch provides a barrier that can trap spores on the ground and minimize them splashing upwards onto a plant which can help reduce infection and spread.
- Organic matter addition: Organic mulches slowly degrade over time and can add organic matter to the soil, which is an important factor in maintaining health soils.
- Materials: Mulches can be divided into two categories: inorganic and organic.
Inorganic mulches include all of the plastics. Plastic will not degrade over time but it may break down and need replacement. Water can’t penetrate through plastic, so you will have to irrigate and plant into holes cut into the plastic. Black plastic mulches will also warm the soil. This can be used to speed up soil warming early in the season.
Organic mulches are many and varied. Common ones include: hay, straw, newspapers, chopped leaves, shredded wood or bark, wood chips, coir, cocoa bean hulls, pine needles, grass clippings. They will slowly break down over time, although that length varies, but anticipate reapplication anywhere between 1-4 years. Apply about 2-4” and be prepared for it to settle. Apply during the growing season after soil has warmed up- because mulch can insulate, applying organic mulches very early can help keep cooler soils cool.
Rock and stone may look nice but can lead to problems. These are often seen in landscapes. While sometimes serving a purpose in terms of landscape engineering, rock and stone don’t help your plants as a mulch. They compact the soil due to weight as well as promote over warming of the soil. Once weeds establish themselves in these beds, it can also be challenging to remove them. Use rocks with caution.
For a long time, the use of landscape fabric was the recommended norm. Unfortunately, this product can result in more headaches down the road than it is worth. Landscape fabric is a porous black fabric laid down between the soil and mulch layers in a garden bed. The point of it is to reduce weed pressure while still allowing water to reach the soil/root systems. It works great initially. Over time, however, it breaks down. Weeds then start growing up through it and it can be a large mess trying to remove them. Also, as the mulch degrades on top, it creates a layer between the landscape fabric and the mulch prime for weed seed germination.
-
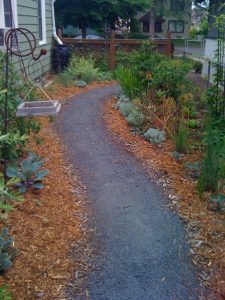
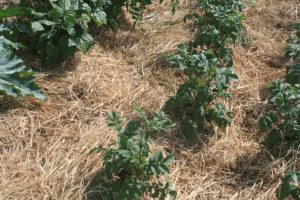
- Wood chips are used to mulch the garden along the path.
-
- Straw mulch applied to a vegetable garden.
-
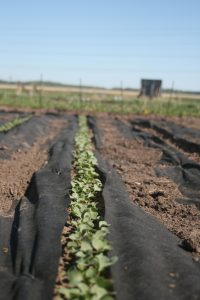
- Black fabric is strategically used as mulch and to warm the soil.
Problems with incorrect mulching:
Over mulching: There can be too much of a good thing. Putting on too much mulch (in excess of 4 inches, unless using straw, where you can use up to 6 because it will reduce in size over time) can result in numerous problems, including:
- reduction in oxygen to root systems.
- root rot if too much water is consistently maintained in the soil.
- formation of a waterproof mat as materials degrade and compact over time
- prime habitat for rodents and other creatures who may munch your plants
- a moist, dark environment for disease to form
Mulch volcanoes on trees: If you’re wandering around your favorite park and see a mulch volcano, now you, too, will know what to do! Mulch volcanoes happen when mulch is piled too close to the trunk of a tree or the crown of a plant. Mulch should be spread out over the root system, and not up the trunk! This can again result in decreased oxygen to the root systems, too much moisture leading to root rot, and shallow roots forming in the excessive mulch that can easily dry out in times of drought.
Fertilization
Fertilization
Just like us, plants need proper nutrition to grow and thrive. The major plant nutrients are nitrogen, phosphorous and potassium. Nitrogen is the nutrient that helps drive the production of vegetative or green tissue.
Nitrogen naturally cycles through the environment. Here is a very brief overview of the nitrogen cycle: Nitrogen exists as a gas in the air, in organic forms in plant and animal bodies, and in inorganic forms in the soil. Certain microorganisms found in soil can process nitrogen chemically into forms that plants can use. Other microogranisms exist in the root nodules of certain plants, such as soybeans, and are able to take the nitrogen from the air and chemically change it from a gas into a useable form. This is often referred to as “fixing nitrogen”. This useable nitrogen can then be taken up by the plant and used for life processes (and to make new vegetative tissue). Once the plant dies, the dead plant tissue decomposes and becomes a part of the organic matter pool in the soil. Soil microorgansims again process the nitrogen from this organic matter into plant-useable forms and the cycle continues anew.
Because nitrogen is so important to plants and may be in limited supply in the soil, it is often supplemented to encourage green or vegetative growth. However, before applying any fertilizer of any plant nutrient, it is highly recommended that you test your soil. Soil testing quantifies the existing nutrition in your soil as well as assessing other important characteristics, such as pH and organic matter. You may not need to add any additional phosphorous or potassium, so finding this information out is helpful to you and can save time, money, and prevent the unnecessary introduction of nutrients into the environment.
Besides the soil conditions, what type of plant you’re growing will also affect how often you fertilize. Trees and shrubs will likely require little to no fertilization while an annual flower bed will require more frequent applications for optimal growth.
Granular fertilizers:
These granules are applied to the soil surface and either watered or lightly worked into the top of the soil. They dissolve upon contact with water, allowing the nutrients to be absorbed by the plants. Examples of how these can be applied: a lawn, with a broadcast spreader that you push and it distributes; a perennial flower bed, spread in a little circle around the base of the plant and water in.
Slow-release fertilizers:
These are similar in a way to granular fertilizers. They are little granules that you apply and water slowly dissolves them over time. The major difference is that these slow-release granules have a coating that dissolves slowly, allowing for the gradual release over time. These can be purchased and applied to a bed when you prepare it for the season. They’re also found in potting soil blends that you would use for containers.
Compost:
Often added to soil to improve the organic matter content and structure, compost contains small amounts of nutrients that are gradually broken down over time. You can apply compost when preparing a bed for the season or even top dressing around the base of a plant for a very slow release of nutrients (top dressing means putting it on the soil surface)
Manure:
This is a good example of an organic fertilizer. When adding manure to your garden, make sure it is properly composted and we recommend doing it in the fall or very early spring. (You can also purchase composted manure.) Composting and time to exist in the soil allows any pathogenic bacteria to be destroyed. Manure, similar to compost, will not add a huge immediate punch of nutrition to your plants but is a slow-release of nutrients. It also adds organic matter.
How to fertilize:
How you fertilize depends on the type of fertilizer you use. Here are some common designations you should be aware of:
- Organic vs. inorganic fertilizer: This refers to how the plant nutrients exist in the fertilizer. Organic fertilizers contain the plant nutrients in complex molecules that break down over time, resulting in a slow release fertilizer. A good example of this would be a cover crop that you till in and allow to decompose over time. Other examples include compost, bone meal, and blood meal.
- Inorganic fertilizers contain ready-to-go nutrients in the form of salts that dissolve in water and are more quickly accessible to the plant. A good example of this is Miracle Gro, a product that you can dissolve in water and apply for quick absorption.
Here are some common fertilizer formations and how you could use them:
- Soluble inorganic fertilizer: These are a solid or liquid that you add to water and apply. Because they dissolve in water, these nutrients are very quickly available to a plant. They also will pass through the soil or container quickly and need to potentially be applied more frequently. You would commonly use this type of fertilizer in annual containers or beds. It can be as simple as putting some fertilizer in a watering can and stirring. Additionally, special attachments exist for hoses where you add fertilizer to the container, turn on the hose, and spray- it mixes it for you.
- Granular fertilizers: These granules are applied to the soil surface and either watered or lightly worked into the top of the soil. They dissolve upon contact with water, allowing the nutrients to be absorbed by the plants. Examples of how these can be applied: a lawn, with a broadcast spreader that you push and it distributes; a perennial flower bed, spread in a little circle around the base of the plant and water in.
- Slow-release fertilizers: These are similar in a way to granular fertilizers. They are little granules that you apply and water slowly dissolves them over time. The major difference is that these slow-release granules have a coating that dissolves slowly, allowing for the gradual release over time. These can be purchased and applied to a bed when you prepare it for the season. They’re also found in potting soil blends that you would use for containers.
- Compost: Often added to soil to improve the organic matter content and structure, compost contains small amounts of nutrients that are gradually broken down over time. You can apply compost when preparing a bed for the season or even top dressing around the base of a plant for a very slow release of nutrients (top dressing means putting it on the soil surface)
- Manure: This is a good example of an organic fertilizer. When adding manure to your garden, make sure it is properly composted and we recommend doing it in the fall or very early spring. (You can also purchase composted manure.) Composting and time to exist in the soil allows any pathogenic bacteria to be destroyed. Manure, similar to compost, will not add a huge immediate punch of nutrition to your plants but is a slow-release of nutrients. It also adds organic matter.
Depending on what product you’re applying and the needs of your plant, you will need to keep some general fertilization rules in mind in regards to timing and frequency of applications.:
- Trees and shrubs: rarely if ever require fertilization. Do so based on the results of a soil test
- Perennial beds: Perennials generally don’t require much fertilization. Established perennials may benefit from an early spring fertilization using a slow release fertilizer before or during the first flush of spring growth. If you’re starting a new perennial bed, you can also incorporate fertilizer into the bed prior to planting. .
- Annual beds: Before the bed is planted, you can incorporate fertilizer into the soil and follow up with another fertilization in 6-8 weeks. If your annuals grow later into the fall, a third application can be done in August. If using a slow release fertilizer and applying to the planting bed at the beginning of the season, you can expect to get 3-4 months of fertilization, depending on temperature and moisture conditions.
- Containers:How often you fertilize containers depends on what type of fertilizer you’re using. Slow release fertilizers can provide 3-4 months of fertilization. Soluble fertilizers can be used every two weeks or so throughout the growing season.
- Lawns: Depending on the needs of the lawn and maintenance practices, fertilization can occur up to 3-4 times per year, usually in early spring, mid summer, and fall.
Always apply fertilizer by following the label, ideally in conjunction with a current soil test.
We don’t want to make fertilization seem over complicated, but there are a few other things you should be aware of when fertilizing.
What happens when I fertilize too much?
One thing that can happen: Fertilization with nitrogen encourages green growth. If you put on too much nitrogen fertilizer or too often or before the plant has flowered, you will encourage excessive green growth. This is a problem if you want your plant to produce flowers or fruits/vegetables. Plants that are putting their energy into putting on vegetative tissue aren’t putting that energy into making flowers and fruits, so you might not get those tomatoes you were hoping for but you may see a ton of leaves and stems!
Over fertilizing also can result in root injury, which can show itself above ground by wilting, poor growth, or even plant death.
What happens when I fertilize too little?
Often plants show us symptoms of a problem, and this can happen when a plant is nutrient deficient- a way of saying that a plant isn’t getting the nutrition it needs. If you’re missing a little bit of fertilization here and there, you might not see much going on and the result may be that your plant doesn’t thrive as much as it could.
But if there is a big need not being met, you may see symptoms in leaves such as different coloration or lack of coloration, dieback, etc. .
A very common example: Plants that lack nitrogen will appear chlorotic. This means the leaves will look light green or yellow because they don’t have the nitrogen needed to make the chlorophyll.
Watch out for that phosphorus!
Phosphorous run off is a big concern for our lakes in waterways because it can encourage algal blooms. Run off refers to when storm water travels over the ground surface, picking up fertilizers and other contaminants along the way and depositing them in our waterways. For this reason, make sure you are only applying phosphorus if needed or indicated by a soil test. In fact, depending on where you live, you may even have a ban on applying phosphorus to your lawn unless allowed by specific exemptions.
Manure safety
As mentioned earlier, make sure you are using composted manure to avoid contamination by harmful bacteria like E. coli. Store bought manure should have undergone a heat ‘kill step’ and should be safe. Uncomposted manure or poorly composted manure may the harmful bacteria. Regardless, always wash any produce you grow thoroughly, especially crops that grow in the ground, such as carrots or potatoes.
Pruning
Pruning
Gardeners may prune plants for many reasons. You may prune for aesthetics, and manipulate the size and shape of the plant. Plants may be pruned for pest management, to remove dead or dying parts, to encourage fruit tree production, or to reinvigorate the plant. We’ll now cover a few pruning concepts, with more to follow in other modules.
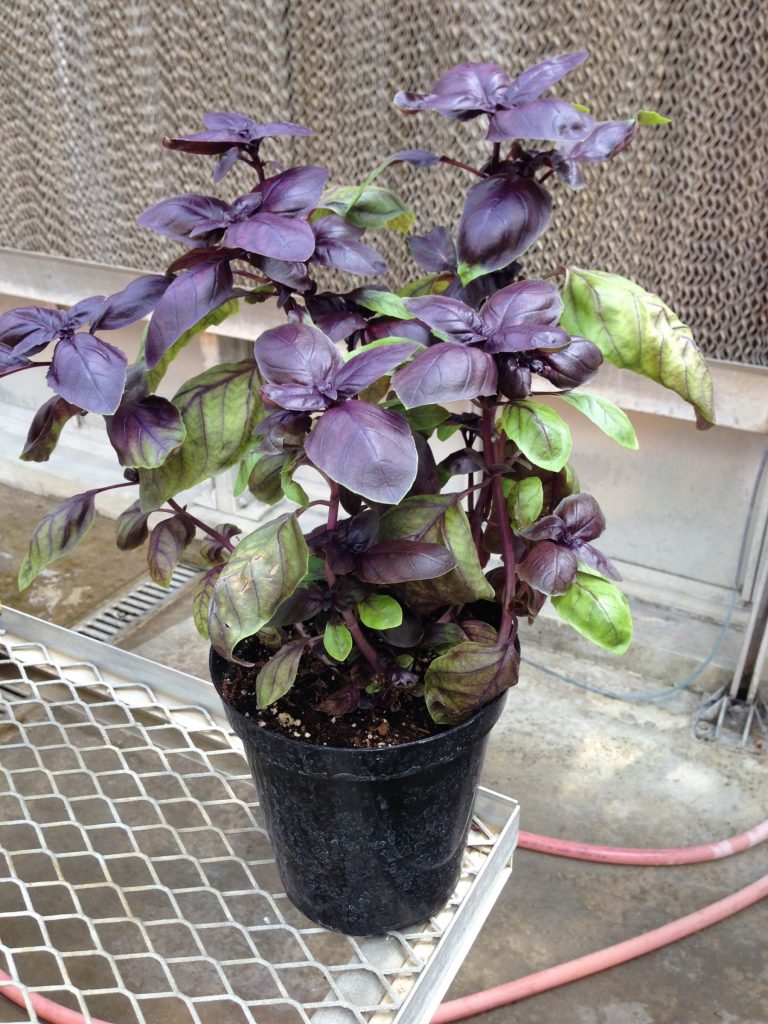
Pinching a plant involves the removal of the growing points at the tips of branches and stems. When done correctly on herbaceous plants, this results in plants becoming bushier. When done incorrectly on woody plants, this can result in brooming and dense outer shells forming on shrubs.
-
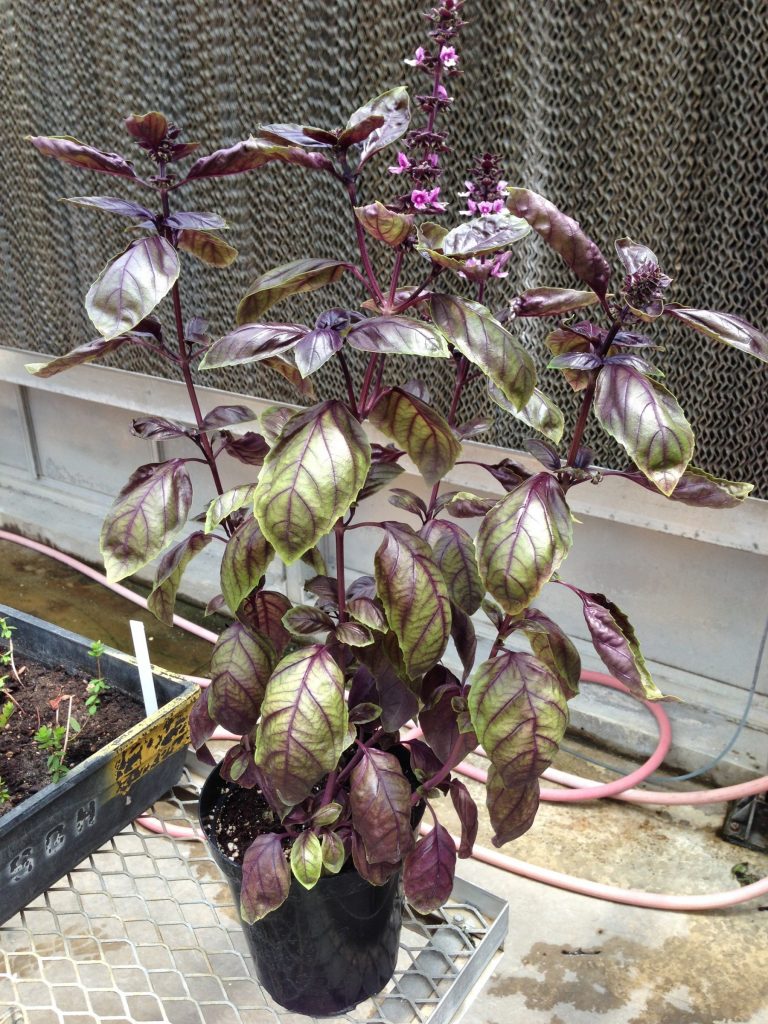
- Overgrown and leggy basil plant.
-
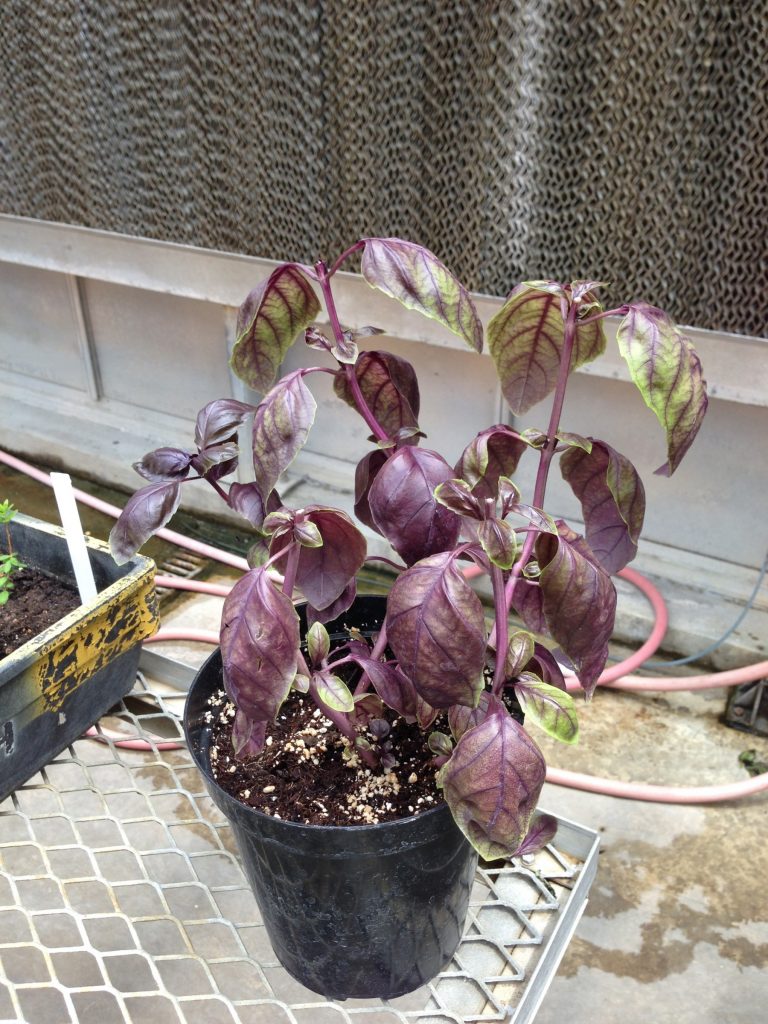
- Each stem was pinched back to a node.
-
- After several weeks the basil has regrown branches and has become denser.
Disbudding is a pruning method focused on the flowers clusters. If you want a single, bigger flower you can remove the secondary buds. This is also a common practice for apple growers. They will preserve the “king fruit” in the cluster and remove the secondary fruits. This will result in fewer, but bigger apples.
Many of our favorite plants are chosen because of their blooms and flowers. However, once that decorative display is finished, you may be left with an unsightly mess. Deadheading is the removal of spent flowers from the plant. Not only does this give the plant a clean look, you may also prevent it from forming unwanted or messy seeds and fruits.
As plants grow, they reach for the sun. This may result in plant growth that may not always be the most supportive or prone to breakage. With structural pruning, we help guide and shape a plant in order to minimize branch breakage as it grows.
The word “suckers” is thrown around quite a bit in gardening. Suckers can be the unwanted sprouts that appear from the base of your apple tree.
It is also a method of pruning tomato plants that removes side shoots and trains a single stem to form.
Garden Clean Up
Garden Clean Up
When you grew up, you may have been told to go and clean your room! Well, sometimes, you need to go and do the same in your garden. While there are different levels of garden clean up that you may choose to engage in, there are some basic ideas behind why you need to do it.
Garden clean up is an important part of Integrated Pest Management! Cleaning up plant debris in your garden is one excellent way to remove disease inoculum that could cause disease problems the following year. It’s the idea that an ounce of prevention is worth a pound of cure. The same idea also holds true for insect pests that have laid eggs or overwinter on plant debris and can then continue their life cycles the following year (causing havoc in your garden!).
Some people do choose to leave up stalks, seed heads, etc. to add winter interest to the garden. Keep in mind that these plant structures also serve as habitat or overwintering sites for animals and beneficial insects as well. It is up to you how you much or little you choose to remove from your garden in the fall or early spring, but it would behove you more to do so if you have suffered an intense pest (either insect or disease) infestation that year.
When should I do this and what do I do?
Commonly, you prepare for the following year by doing “fall cleanup”. This refers to a variety of activities but mostly fall under one big category: cut and remove! Herbaceous material that has died back (meaning it’s now brown and dead looking) can frequently be cut back and removed. Before attacking all your herbaceous perennials with your pruning shears, make sure this is good for them! Some perennials survive the winter better left alone, some will give winter interest, and they can also serve as animal food sources or overwintering sites for beneficial insects. If you know the plant has diseased material, cut back and remove diseased material. Don’t leave it in the garden or use as mulch. You can usually compost these materials and if your pile is getting to appropriate temperatures, you will kill the disease inoculum and be fine to use the compost. Your manual contains some specific examples of disease not to attempt to compost. You can also remove the diseased material and take it to a municipal compost dump or in most cases, bury it.
Leaves are another item you may be dealing with in the fall. Fallen leaves are a great resource and can be chopped up using a lawn mower or chipper/shredder to create mulch for your beds. They can be composted as well. Leaves are also able to be chopped up with a mulching or push lawn mower and left on the lawn in small bits to decompose throughout the rest of the fall, winter and spring. This is a very different practice than has historically been done but can result in weed suppression, less work removing leaves from the area, and doesn’t harm the turf.
When spring hits, if you didn’t do good fall clean up, you should get into your garden and do some early spring cleaning! This again refers to the removal of diseased or dead herbaceous tissue. There may be some plant material you left in the fall that has died back and matted onto the surface. You can carefully remove that, taking care to not damage any potentially emerging tissue. You can also remove leaves or other debris that has landed there since fall.
In the spring and summer, there is another item you may need to consider: what do I do with my lawn clippings? If you are maintaining a lawn, you can use a mulching mower to cut the grass and leave the clippings on the lawn. Throughout the season, leaving the clippings on the lawn is the equivalent to one round of nitrogen fertilization! Not a bad deal for saving yourself some work, and contrary to popular belief, this practice does not add to thatch. A thick thatch layer can be the result of overall poor soil heath or even due to over-fertilizing. If you prefer to bag or rake your lawn clippings, consider composting them. As fresh green material, they count as the “green” component of the “browns and greens” required to create a pile. Grass clippings can also be repurposed as mulch if they are not diseased, treated recently with herbicide (consult the herbicide label for more information), or are really long and wet, conditions which may form a waterproof mat.
Weeding
Weeding
There are no shortage of gardening activities during the growing season and one time consuming; one is weeding. Whether you really dislike it or enjoy the quiet repetition of it, weeding is an important activity that can make or break a garden bed.
Weeds are consummate survivors and excellent competitors. Besides taking over your garden, weeds can take away the water, nutrients, and even access to sunlight that desired plants need. We will discuss weeds more thoroughly in that specific module, but want to point out a few important reminders in the context of general gardening practices. First, it is important to make sure that when you are establishing a bed, you have a plan to eliminate existing weeds and to deal with them during the initial years. If you don’t, weeds will likely take over quickly and you will have lost the work you initially put in. Depending on the methods you use to control weeds (chemical, cultural, such as mulch to help suppress weeds, or mechanical, such as hoeing or hand pulling), you will need varying levels of time to commit to dealing with them.
Second, timing is also a big thing with weeds. It is important to control weeds before they have the opportunity to set seed. Weeds make a prolific amount of seed, and many weeds together make an incredible amount that you don’t want to be dealing with! Employ appropriate weed management practices prior to seed set to prevent those seeds from entering the seed bank in the soil. In addition, if you are choosing to use herbicides to manage some species of weeds, timing that appropriately may help you reduce the amount of times you spray and make your treatment more effective. Spraying in the summer when plants are putting out green growth may only burn back the top growth and not kill the entire weed, especially for some perennial weeds. Spraying during the fall when plants are putting energy into their root systems is more effective, as is spraying when a weed is flowering.
Dividing Perennials
Dividing Perennials
Another plant maintenance item you may have heard about is called “dividing”. Dividing plants is literally that: physically separating a bigger plant into smaller chunks and then replanting. There are more details for this and depending on your plant in question, there will be different reasons for why you do it and different ways to do it. A really common example you may have heard of is with hosta. You would dig out the whole plant, use a shovel or other tool to chop the plant into sections, and then replant the sections treating them each as a separate, complete plant. (The important part is to make sure each section contains all the plant parts: stems, leaves, roots and growing points.) The time of year you do it also depends on the type of plant you have. We will discuss dividing in more detail in the Herbaceous Perennials module but wanted to make mention of it here as it may be something you end up doing to maintain overgrown or crowded plants.
Plant Supports
Plant Supports
Sometimes plants, like vines or plants with weaker or tall stems, require a little help to stay upright. Plant supports can help!
There are many types, but a couple very common plant supports/situations where you would use them include:
Useful for vining plants, both vegetable and ornamental, from melons, peas, and cucumbers to clematis and heavier wooden vines. Vines can grow up the trellis over time. A trellis can be made of wood, or use string, twine or fishing line to create supports. You may need to help train the plants a little, but this can be as simple as lifting a tendril up onto part of the trellis to loosely using twist ties to secure the vine to the trellis. Cages are metal structures that you put around a plant and it grows up surrounded by the metal circles. These are commonly used for tomatoes and are widely available.Trellising:
Cages:
This is a great way to re-purpose your branches leftover from pruning! Pea-staking simply refers to taking a stick or branch(s) and creating a structure for the plants to grow over/on/up and through. You can make a row (like with peas) or create a small circle for floppy plants to grow up through. /column-one-half] Plant circles: Another very common plant that needs support is the peony. This is a great example of a plant that has multiple stems that can grow up through the plant circle (a wire hoop) and be supported throughout bloom.Pea-staking:
But it’s not just about keeping plants from falling over. There are other benefits, like
- improving harvest. Think back to the tomato: if properly caged (or supported in other ways), the tomatoes will be held up off the ground, better able to dry off in the air. They are also easier to reach and see.
- part of your IPM toolkit: you’re helping increase airflow around the plants by ensuring they are upright and properly spacing, creating a less favorable environment for disease formation
- attractive garden element: trellising can provide a unique vertical element in the garden.
- makes weeding easier!
Raised Beds and Containers
Raised Beds and Containers
Gardens come in all shapes and sizes. Many people choose to grow plants in containers or raised beds instead of directly in the ground. Many of the exact same principles apply for container or raised bed gardening, such as how to use Integrated Pest Management or selecting the right plant for the right place, but there are some specific things you should be aware of when working with either a container garden or a raised bed.
First, what you use as a material for the raised bed or container does matter! For a raised bed, you can build it out of many things but want to make sure to avoid things like treated wood or old railroad ties. Both contain chemicals that can be harmful to humans or plants. Keep in mind that any plastic materials used will degrade over time and the wood you use will weather. You also don’t necessarily need to build a raised bed. You can even make a raised bed by simply mounding up soil to a desired height! For container gardening, there are many types of containers that can be suitable, but what you choose can matter in terms of how heavy you want to make the pot, how you want the pot to look visually, how hot it gets and how it quickly it dries out. Some materials, like clay or ceramic, are porous, which means it will dry out faster. Those types of materials are also heavier than a plastic pot. (Heavier might mean that the container is less likely to blow over in a strong wind but it will be harder to move.) Pots that are darker in color will heat up more rapidly, which can affect the roots and plants.
We don’t want to overcomplicate the container idea- just give it a think before you make your choice but feel free to experiment. The most important thing about whatever container you choose, though, is to make sure that excess water can readily drain out! There needs to be holes in the bottom of the container in order for water to drain out. You don’t want to leave water pooling in the bottom of a container because over time that will likely result in plant health problems, such as root rot, shallow root growth and even plant death.
Improved drainage for a raised bed, on the other hand, is one of the reasons to try that style of gardening! If you are in a situation with poor drainage, going to a raised bed can help improve that issue. Because raised beds dry out more quickly, you may need to monitor moisture levels to maintain appropriate water levels in the soil.
Garden soil can be used in a raised bed. Consider amending with compost to add organic matter. For containers, you will want to use a soilless growing medium… this is the ubiquitous “potting soil” found pretty much everywhere during the spring! Read what is in your potting soil. Some contain slow-release fertilizers, which can take the place of using a water soluble fertilizer routinely. Compost can also be added to this growing media if you wish. We don’t recommend using garden soil in containers. Soilless mixtures used in containers will dry out quickly, so you will need to likely water every day during the hotter parts of the growing season. You can also look into more passive watering systems, such as plant stakes that transmit water to the soil, if you predict you’ll be unable to maintain that type of watering schedule.
Season Extension
Season Extension
Whether you’re growing vegetables or ornamentals, Wisconsin has a finite growing season and you may want to make the most of it. Increasing the number of days in the season is one way to buy some more time to harvest produce or enjoy your plants. This is called “season extension.” There are tools and techniques for doing that help manipulate the temperature around the plant so that you can add a bit more time each year to grow stuff. We’ll discuss some options by season so you can consider how you might use them throughout the year.
In the spring, temperatures start off cold and warm up over time. Yet spring can be unpredictable! There may be an unexpectedly colder night or two thrown in there as well. There are a few options for to help get your plants through this period. One, you may want to keep the air temperature surrounding the above ground portion of the plant warmer. For individual plants, you can use items like cloches or walls o’water. A cloche is like an upside down bowl you place over a plant. It is made of glass or plastic and helps trap heat inside to keep the air temperature warmer for the plant. A wall of water is a flexible plastic water holding device that helps you insulate the plant and maintain a good surrounding air temperature as well. You could use these over a newly transplanted plant to protect above ground growth.
There is also below ground to consider! Soil temperatures are also cool in the spring and takes time to warm up. Planting before the soil is warm enough for a particular species can prevent germination (if direct seeding) or can harm plant growth in transplants. To help warm the soil, you have options. The cloche that we mentioned before can be used to help warm the soil over a smaller area. It will heat up much like a little greenhouse would. Additionally, raised beds (any kind where the soil is mounded above ground) warm faster than the ground itself. Using a raised bed can enable you to get out there earlier in the spring to plant.
Warming the soil with various fabrics also can help get you out there earlier. For example, black plastic can be put on the soil surface and the energy of the sun will heat the black plastic, which in turn warms the soil. This is especially useful for warm season vegetable crops (think tomatoes, melons, beans, corn and peppers). These crops are usually planted after the last frost free date and require warmer soil to grow properly.
Another season extender to mention the cold frame. At their most basic, cold frames are four walls and a clear, slanted roof. They can be purchased, built, or even created by using bales of straw. Plants can grow inside a cold frame earlier in spring because the heat trapped inside keeps it at an appropriate temperature. You can plant into soil in a cold frame or use it as a place where you take flats of plants in and out (like if you were hardening off your seedling transplants). Cold frames can get warm quickly, though, so on warmer days they will need to have the roof opened to allow heat to escape. This is a great tool to help you harden off plants in the spring. What is hardening off? This is the process of acclimating new transplants that have been started indoors to outdoor conditions, where lighting, temperature and wind all play roles in the plant environment. Hardening off is a gradual process, which may start by taking out appropriately sized transplants into non-direct light for a couple hours a day and increasing that over time. A cold frame can help with that process.
In the fall, As temperatures start to cool, you will need to employ similar strategies as you did in the spring to keep the season going longer.
The cold frame again becomes a good option for plants that you can move into it (or, if you planted directly into it, you will want to start closing the lid at night). Depending on the plant, you may be able to keep it growing while there is even snow on the ground.
Another tried and true method that has been employed for a long time is to cover your plants when a cold night is forecasted. You may have wondered before why your neighbor was creeping out with a sheet in the evening tucking in the plants for the night– but it was to protect them from cold or freezing temperatures. You can use old sheets or floating row cover, just remember to uncover them once the threat of cold temperatures has past. People commonly cover things like hanging baskets or vegetable crops (like tomatoes) that they want to continue to harvest from.
Extra stuff

Lecture:Quiz:
Student Materials:
Coordinator Materials: